Lists are an important part of your marketing. They can help you identify marketing-qualified leads (MQLs), segment your contacts for emails, get the right messages to your buyer personas, and create reports.
There are easily more than 1,001 ways to create and use Lists. We’re going to look at a lot of ways to use HubSpot Lists, but certainly not 1,001 ways.
1. Build a list based on Contact Properties
Let’s start with the basics. Go to Contacts > Lists and click on “Create new list” at the upper right.
First, name your list and then choose to build either a Smart list or a Static list. Smart lists will continue to add new contacts to the lists you create based on the criteria you set. Static lists will only add new contacts to the list if you manually add them. Most of the time, you’ll be using Smart lists.
Now set the Criteria for the list. You can use any of the data in your database to create your list.
Select Contact Property from the first drop-down menu. From the second drop-down menu, select the specific Contact Property you want to create the list from, which could range from Lifecycle Stage to Original Source to Employee Size – you get the idea. In the third column, select if you want the value to be equal to, not equal to, simply have the property, simply not have the property, etc. Finally, in the last column, write the value of the Contact Property you want it to match (like Customer, Social Media, 11-200, etc.).

You can choose to add multiple pieces of criteria to your list in the form of AND or OR statements depending on what criteria you want included in your list.
This is what an AND statement would look like:

This is what an OR statement would look like:

If you want to learn more about the differences between and/or segmentation when building lists, check out this blog post.
2. Create lifecyle stage lists
Customers: It would make sense to have lists of contacts that are at various lifecycle stages. For example, you can create a list called “All Customers” where the lifecycle stage = “Customer.”
Contact Property > Lifecycle Stage > Customer
SQLs: Similarly, you can list all contacts that are SQLs:
Contact Property > Lifecycle Stage > Sales Qualified Lead
3. Use lifecycle stage lists to trigger workflows
Lists are a great tool to trigger workflows. For example, let’s say you want to use a list to trigger a change of lifecycle stage. You could name your list “Set Lifecycle stage to SQL,” and the use the following criteria:
Contact Property > HubSpot Score > is greater than or equal to > 30
Contact Property > Lifecycle Stage > is equal to > Marketing Qualified
This is an AND statement that uses the contact’s HubSpot Score (you ARE using lead scoring, right?) as well as lifecycle stage. Then your workflow criteria would be:
List Membership > is a member of > Set Lifecycle stage to SQL
Geek alert: Using the newest enhancement to Workflows, you could also use the above criteria right in the workflow that changes lifecyle stage to SQL. This way you wouldn’t need a list at all.
4. Create persona-based lifecycle lists
Lifecycle stage lists are helpful, but you might really want persona-based lifecycle lists. HubSpot creates a few of these automatically when you add your personas in to HubSpot:
- [Persona Name] All Contacts (automatically created)
- [Persona Name] Leads (automatically created)
- [Persona Name] Leads Back-burner (manually created)
- [Persona Name] MQLs (automatically created)
- [Persona Name] MQLs Back-burner (manually created)
- [Persona Name] SQLs (manually created)
- [Persona Name] SQLs Back-burner (manually created)
- [Persona Name] Customers (automatically created)
Each of these can be quickly created with an AND condition:
Contact Property > Persona > is equal to > I am a HubSpot marketer looking to maximize its potential.
Contact Property > LifeCycle Stage > is equal to Marketing Qualified Lead
Let’s take a look at that “I am a HubSpot marketer looking to maximize its potential” — where does that come from?
When you add your personas into HubSpot, one of the fields is “Best Describes Me,” and that’s the text that you want to use in the first condition. That text lets you separate your contacts into persona buckets and really simplifies and enhances your marketing.
These 8 persona-based lifecycle lists are very useful. Consider setting up all 8 for each of your personas. The nice thing about doing it this way (with the persona name first) is that you can search your list names by persona and each of these lists pop right up.
5. Build a list based on list membership
You can also build a list off of a current list. You may be thinking that this sounds a bit redundant, but it can actually be a great time saver. If you have another list set up and want to use that criteria along with some additional pieces of criteria, this may be a great way to help you save time while setting that up. Or, if you want to create a list that doesn’t include the members of another list you have previously created, this is also another great tool.
Select List Membership from the first drop-down. You will notice that the second drop-down is grayed out. Don’t worry about the second drop-down in this case. In the third drop-down, select either “is a member of” or “is not a member of.” This will let you include or exclude certain contacts. In the final drop-down menu, select the list.

6. Build a list based on form submission
The criteria for this list has quite a bit of flexibility. This will be a list of contacts who have submitted any form on your website.
To get started, select Form Submission from the first drop-down menu. In the second drop-down menu, select “Contact has filled out” or “Contact has not filled out”. In the third drop-down menu, you can choose any form or a specific form. You will notice the blue Refine button under this drop down. Similar to the Deal Property criteria, this will let you get even more specific on your criteria. Click on Refine, and you will have a few options to get more specific: Rolling Dates, On or before date, On or after date, Between dates, and Number of times. After you click on those options, you will have the choice to set specific dates that the form was filled out in or choose the number of times a form was filled out.

In the final drop-down menu, you can choose on any page if your form is used across multiple landing pages or you can choose a specific page that your form was filled out on.

Let’s say your form is used across five different pages, but you want a list of contacts who filled out the form on two pages. You will need to use an AND statement to accomplish this. In the first line, select the specific form you want to create the list from as well as the specific page it appears on. Then click on the first Add another requirement link, select the same form but select the other page it appears on.

7. Build a list based on page views
You can also build a list of the contacts who viewed a specific page. First, select Page View in the first drop-down menu. The second drop-down menu will be grayed out. In the third drop down, you have a bunch of different options depending on what pages you want to view: has visited (exact URL), has not visited (exact URL), has visited (part of URL), has not visited (part of URL), has visited (regex), and has not visited (regex).
After you choose one of those options, you can refine your search based on a date range or the number of times a page was viewed.

In the final drop-down menu, write the URL or part of the URL that you want to build your list.

Let’s get a bit more advanced for a second. Let’s say you want to know the number of contacts who have viewed any landing page at least five times in December 2015. To do this, you would select Page View from the first drop-down menu. In the second drop-down menu, you would select has visited (part of URL). Then you would refine the search to only show the contacts who performed this action on or before December 31, 2015. In the final drop down, you would put your landing page domain.

Then, you would add the “AND” requirement to set up what will look pretty similar to the first line of your list criteria. Instead of selecting on or before December 31, 2015, you would select on or after December 1, 2015.

Then, you would add another “AND” requirement. Instead of selecting the specific dates in December, I would refine the criteria to be the number of times the page was viewed. Then click on Save list.

8. Make lists by job title
Would you like a list of all Human Resources Directors among your contacts? Or all Vice Presidents? Or any other job title?
Much like persona lists, grouping contacts by job title gives you another piece of context to reference when communicating via email. Chances are, different job titles have specific pain points or use your product or service in a unique way. Being able to mention those points via email and tailor your content specifically to those contacts will boost your email performance significantly.
Contact Property > Job Title > contains the word > Human Resources
9. Create a list of your evangelists
When publishing content often, it’s only natural to have a following of evangelists. These contacts download your content and read you blog, but are not necessarily in a position to purchase.
These contacts may be family, friends, colleagues, alumni, or anyone who has an interest in your business, but are not in the sales funnel.
Be sure to create a list of these people in HubSpot and leverage their interest in your content by encouraging them to promote on social media and forward emails to their peers.
Contact Property > Lifecycle Stage > is equal to Evangelist
10.Supercharge your social media with lists
One of the more interesting features of the Social Inbox is that you can build lists based on social activity. Consider the value of a customer list of social media posts, or an employee list. Or maybe you want a list of your social media evangelists.
Employees. A list of employees can keep you from marketing to your own people. Monitoring your employees on social media can help you show them that you care. According to a study by Weber Shandwick, 50% of employees post messages about their employer.
You’ll need to add your employees manually, or simply upload a CSV file of your employees.
Customers. Make sure you monitor your customers for any questions or concerns they may express on social that you can delight them with an answer.
Social media evangelists. This is a great idea for you to be aware of and reward your most loyal fans across all your social networks. You can create a list that automatically adds contacts when they have clicked X number of times on social messages. Thank your loyal fans; reward them; do something to let them know you know and care they exist. Did someone in the list stop engaging? Find out why.
This will be a smart list:

Make sure that you end up with three rules (an OR list), not three requirements to the same rule (an AND list). An AND list only includes contacts that meet all of the requirements while an OR list includes contacts that meet any of the requirements. To do this click the “Add another set of requirements” not “Add another requirement.”
11. Nurture contacts who haven’t taken action recently
We know not everyone takes the next action in the buyer’s journey right away. Maybe they got involved in “putting out fires” somewhere else or maybe the timing wasn’t right for them.
If they have go through your lead nurturing sequence of emails and have taken no action, move them to a “quiet list.” Better yet. . . move them to a persona-based quiet list that includes lifecycle stage. Name it [Persona Name][Lifecycle Stage] Quiet List.
How do they get onto this list? At the end of your lead nurturing workflows, add an action that puts them on the appropriate list for their persona and lifecycle stage.
With your quiet lists in place, you can now start a nurturing campaign to each persona/lifecycle stage combination to provide them more of the information they are interested in.
12. Nurture lost deals
This probably never happens to you, but from time-to-time we lose deals. When this happens, we add the contacts from the deal into a Static List so we can continue to talk with them.
If this happens to you, too, you can customize the nurturing emails to come from the assigned sales rep, adding a special personal touch. This automation helps your sales reps touch a larger number of prospects without exhausting manual effort on the so-called “bottom of the barrel.” It will pay off over time and it will plug the holes in your funnel where people are prematurely falling out.
13. Send qualified leads to your sales team with a list
Most companies have rules for assigning leads to Sales. It could be geography, company size, product interest, or any combination of factors.
You’re probably already sending an email notification to salespeople with information on your sales-ready leads. Why not make a list of these at the same time, so that you can track every lead given to every salesperson? Wouldn’t your VP Sales really appreciate this list?
14. Lists help you connect with your other apps through Zapier
In case you’re not familiar with Zapier (is that possible?), they connect HubSpot with 400+ web apps. Zapier uses triggers/actions to automate work between HubSpot and other apps. A trigger is an event that happens in one app and an action is the event that Zapier automatically performs in another app.
Zapier is great for event styles integrations that follow this formula:

Think of Zapier as a blueprint for a task you want done over and over again. Once you’ve made a Zap, it will run automatically without any additional effort on your part.
You can monitor activity in your dashboard, manage your connected accounts, and turn Zaps on and off anytime you want.
Here are some of the most popular Zaps for HubSpot in no particular order.
- Add new HubSpot contacts to a Google Spreadsheet – Zap Template
- Get an email alert for new HubSpot contacts – Zap Template
- Get an SMS or Phone call alert for new HubSpot contacts – Zap Template
- Send leads from a Wufoo form to HubSpot – Zap Template
- Send leads from an Unbounce landing page to HubSpot – Zap Template
- Send leads from a Gravity Forms form to HubSpot – Zap Template
- Send Eventbrite registrants to HubSpot – Zap Template
- Create Highrise contact form HubSpot contact – Zap Template
- Create Base CRM lead from new HubSpot contacts – Zap Template
- Add new HubSpot contacts to a MailChimp list – Zap Template
15. Use lists to limit how many contacts get synched with Salesforce
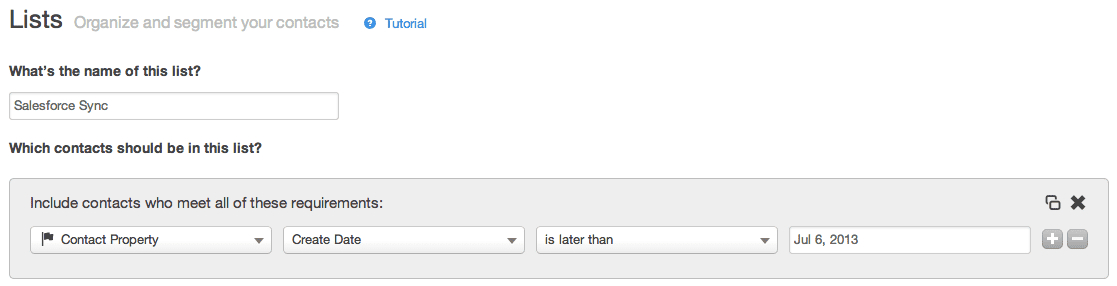
If your organization has been using HubSpot for a time but it’s new to Salesforce, you may not want all of your HubSpot Contacts to synchronize to Salesforce. To limit the number of Contacts that sync to Salesforce by the date the records were created in HubSpot, create a new Smart List called “Salesforce Sync.”
To do this, from the menu, select Contacts>Lists. Click on the Create a New List button.
Set the Create Date Contact property to be later than a specific cutoff date.
 Note: you may want to include additional rules that exclude certain Contacts from synchronizing to Salesforce. For example, there may be certain form values selected by a visitor that definitively exclude that visitor from ever becoming a sales prospect.
Next, from the menus, select Contacts>Contact Settings. In the Salesforce Connector settings, select Settings.
In the Inclusion List section, select “Salesforce Sync.”

Click on the Save Setting Changes button at the bottom of the screen.
If HubSpot Contact records that were created after the cutoff date do not appear in Salesforce, there’s a Resync Contacts with Salesforce link in the bottom left that allows you to force Contacts from the list into Salesforce. If you move the cutoff date back in time, you can use this link to bring additional Contacts into the Salesforce Lead object.

16. Use lists to segment your email marketing
According to eMarketer, 39% of email marketers that practice list segmentation see better open rates, 28% see lower opt-out and unsubscribe rates, and 24% see better email deliverability, increased sales leads, and greater revenue.
You can segment your list for email marketing in a jillion different ways. . . but we’ll list a few of them here to get you started. Keep in mind that while some of these recommendations will work wonderfully on their own, many of them are at their absolute best when crossed with other segments, triggers, and lead intelligence data.
|
|
|
17. Build a list based on events
HubSpot Events is an Enterprise-only feature. It allows you to track actions or behavior someone takes on your website. For example, you can track the number of people that click on elements of a page. One great benefit of using Events is you can create a list of contacts based on events. If you want to know who of your contacts took certain actions on your website, you can create a list for that.
Start by clicking Event from the first drop-down menu. The second drop-down menu will be grayed out. In the third drop down you can select “has had event” or “has not had event.” You can refine this drop down based on the date or the number of times someone completed an event. In the final drop-down menu you will see a list of Events that have been created. Select the Event you want to create the list from.

18. Exclusion lists
So far in this post, all of the lists were designed to include certain groups of contacts, but lists can also be used to exclude.
Because we work with B2B companies, we can safely assume that contacts that do not use a corporate domain in their email address are not good prospects for us. So we created an exclusion list based on email domains. We call this one Exclusion List – Certain Domains.
We also only work with companies in the United States, so we’re not interested in emailing foreign email addresses. Here’s a screenshot from HubSpot new List tool, showing how we did this.
This list is a little trickier because we don’t collect information in the Country field. So we look for contacts where the IP Country is known and is not equal to “United States” or “Canada.” We use “is not equal” because this is an exclusion list — we want to exclude people who are not emailing from the US or Canada.
Then, because we have a couple of Canadian customers, we set Lifecycle Stage “is not equal to Customer or Evangelist.”
Geek alert: In point of fact, we delete the out-of-country contacts every 6 months just to keep the database clean. At the same time, we also delete all the email bounces that accumulate.
When we send emails to our entire database, we exclude these exclusion lists so as not to encourage more interaction from these groups.
19. Create a list from an integration action
There are two integrations available from HubSpot that you can use to build lists from: SurveyMonkey & Citrix. Using the SurveyMonkey integration, you can build lists off of whether or not contacts have responded to a survey or even specific answers to questions on the survey.
If you have the integration set up, you will see SurveyMonkey Survey as one of the options in the first drop-down menu. In the second drop-down menu, select the survey that you want to use for the list. In the third drop down, select the action taken within the survey whether that was simply responding or not responding to the survey or a specific question that was answered. In the fourth drop-down that appears (which it will when you select a specific question), you can select “is equal to,” “is not equal to,” “has answered this question,” or “has not answered this question.” If you select “is equal to” or “is not equal to,” you can then write in the specific survey answer.

If you want to build a list off an action taken from a webinar, you can do that as well. If you are integrated with Citrix, you can create lists based on whether or not someone registered or attended a webinar.
To get started, select Webinar from the first drop-down menu. The second drop down will be grayed out. In the third drop-down menu, you can select “has registered for,” “has not registered for,” “has attended,” or “has not attended.” In the final drop down you can select any webinar or a specific webinar that you held.

Enough already!
1,001 lists? If you take all the database properties and all the criteria options available for each of them, there are well over 1,001 lists you could create in HubSpot! And that’s not even counting the various AND/OR combinations.
HubSpot’s List tool is very powerful and flexible. Hopefully these ideas have gotten you thinking about new lists you need to create.
Light-painting image courtesy of Eric Paré via Flickr.
![]()