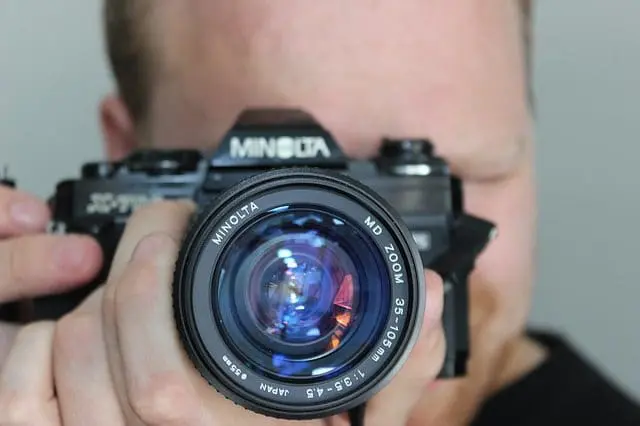
Camera Basics: Using a DSLR
Do you have a DSLR camera but can’t quite understand each and every button and dial? Here are some tips and tricks to shy away from flicking your camera into Auto and master Manual settings.
SHUTTER SPEED, ISO AND APERTURE
Shutter speed, ISO and aperture all compliment each other – you cannot use one without the other properly. In order to take great photos and be fully proficient in using your camera manually, these three things are the most important to nail.
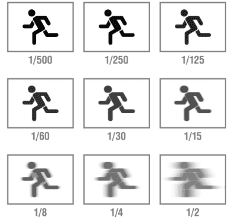
Shutter speed controls so many aspects of photography. If you want to get somebody running fast pace and you want to stop that action and make sure the photo is clear, maybe you’re taking a photo of your pets running fast and you want to make sure they’re not blurry, then you will have to adjust your shutter speed to run at a faster rate. Having a high shutter speed opens the shutter and closes it very very fast, stopping that action. Shooting that scene at a high shutter speed such as 1/320 will most likely give you a clear and concise photo of that action, but if you shoot it at a shutter speed like 1/60, there will be motion blur associated with it because the shutter is not grasping the image fast enough.
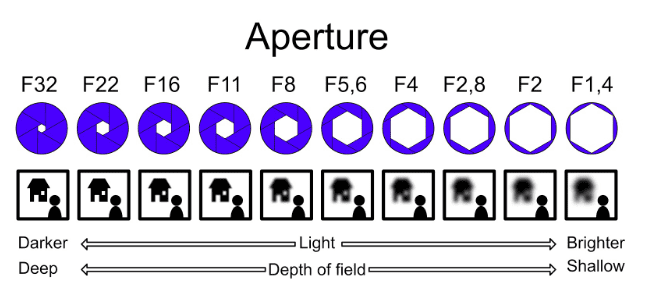
 Aperture has two uses in photography: it let’s a lot of light in but it also changes what happens in the background. For example, if you are shooting a landscape, you want to be able to see the entire landscape sharp and clear. So, you want your aperture to be set at something like f/8, f/11, f/22 or something really high to capture all the detail. The higher the f stop, the smaller the opening of light. If you open the aperture all the way up to something like f/4, everything in the background will not be in focus and a lot of light will be coming in. For example, if you’re taking a headshot outdoors, the subject will be in focus to your liking, but the background will be out of focus. In this case, you’d want the shutter speed to be much faster to counteract the light coming in from the aperture. When you combine those two details together (shutter speed and aperture) you get a clear, crisp image. Different lenses will give you different results – not all lenses will open up super wide. Some are longer and some are shorter than others, that’s why we change lenses.
 ISO comes into play in low-light situations – indoors, at night, and at times where we don’t have enough light we’d crank up the ISO. The best way to explain ISO is calling it fake light. It’s the sensitivity to the image sensor, in your camera. When we change the ISO, we’re changing the image sensitivity, in camera, to light. If your indoors and you have set your shutter speed super fast and aperture super wide, but you still need more light, you can crank up your ISO and bring “fake” light to your image. With each increment of ISO, the brighter it gets, more you use it, the worse the image becomes. It becomes pixelated and grainy making it a noisy image. The better the camera, the better they are in low light, the higher ISO they can be at without becoming noisy.
The exposure triangle is a common way of associating the relationship of aperture, shutter speed, and ISO. This relationship is portrayed through the visual of a triangle because one must balance all three of these in order to achieve a well-lit photo or video. As you can see, by adjusting one leg or another, it will always affect the amount of light that comes through the lens, the sharpness and the depth of field.
 WHITE BALANCE
Have you ever taken a photo that came out a little too blue? Or a little on the yellow side? Let’s talk about white balance. Your camera will compensate the natural light given by your environment using different types of light in various settings. This balances out the scenes so that it doesn’t appear too cool or too warm. There is an auto white balance setting on most DSLRs which does everything for you, without having to think about it yourself. White balanced is measured in kelvin cycles from 2000-8000. This is useful if you want to manually white balance and/or match your white balance with another camera. Typically, if you’re shooting footage with multiple cameras, and the color from the cameras are completely different, the white balance is off. In a nutshell, white balance helps you balance the scene so that your footage looks, clean, authentic and balanced.
FOCUS MODES
Focus modes heavily depend on what it is that you are shooting and your creative direction. That will entirely determine on how you focus on your image. There are three main focus modes to go over: continuous, single and manual.
Continuous focus is used when you are shooting something that is moving towards the frame, away from the frame, through the frame, or any other continuous motion, you want to use continuous focus because what that camera is doing, is it’s not locking the focus into one point and if the subject moves out of the that point and they’re not in focus, the camera will constantly be checking and focusing on the subject as it moves. Action sports are a great example of where you would use a continuous shooting mode.
Single focus is exactly how it sounds – when you lock the focus onto a subject, you snap the photo and the focus is as you set it. However, if you lock the focus and the subject moves, chances are the subject will be out of focus because they’ve stepped outside of the plane that you set. So, if you’re shooting things that are not moving very much (landscapes, products, real estate, etc.) single focus is the best option. Keep in mind: if you move, so does your focus point.
Manual focus is also exactly how it sounds – focusing manually. You can do so by flippingf the switch on your lens (on most lenses) or to go through the settings and change the drive mode itself. Manual focus is almost exclusively used for filming television and film where they have people who solely are responsible for pulling focus by measuring the focus to its exact precise mark. This is the toughest of the focus settings to precisely measure correctly, so I would advise to start with continuous or single focus, but feel free to play around in manual focus.
These quick tips and keys are essential for every new beginner in photography or videography. While, this all may seem intimidating, once you begin to practice these skills, you’ll quickly learn how to navigate around a camera, take sharp photos and video and immediately know how to adjust your settings to capture visuals to your liking.