 The twittersphere moves fast. If you only post once or twice a day, then your tweets may get lost in the shuffle. But, the idea of stopping five or six times during your workday to tweet may seem a bit overwhelming and it’s not exactly a great use of your time.
Thankfully, HubSpot has the Twitter bulk upload tool where you can schedule multiple tweets at once.
What can you tweet about?
Before we get started on the nitty-gritty of how to use the use the bulk upload tool, let’s talk about how to make the most out of the tweets you want to upload. Here at Sensible Marketing we love to bulk tweet, and we often take one blog post and tweet about it multiple times. The trick is, we don’t use the same tweet over and over, we spin it as many times as we can in order to make the most out of it. Here’s an example.
The title of this blog is Why You Should Bulk Upload Tweets to HubSpot. Let’s see how we can spin this:
- Why you should bulk upload tweets to #HubSpot.
- Save time, learn to bulk upload tweets to Hubspot.
- No time to tweet? No problem. Use the bulk upload tool in #HubSpot.
- Plan your tweets like a pro. Find out how!
- 5 reasons you should use the #HubSpot bulk upload tool for twitter.
This is just an example of five ways to spin this one tweet. You can easily add five to ten more tweets just by creatively spinning the blog content and title of the blog you want to promote.
What content should you promote?
In a campaign for a current customer we have been promoting blogs, landing pages, infographics and slideshares. For each of these pieces of content we have created approximately 10 tweets each. Altogether this has enabled us to tweet for our customer 20 times a day with unique tweets. The tweets may be repeated throughout the week, but remember the twittersphere moves so fast it’s not likely that your followers will see your tweet more than once. Another way to ensure this is by scheduling the repeat tweets at different times.
Mastering the bulk upload tool
Now that you have your content it’s time to learn the ins and outs of the bulk upload tool.
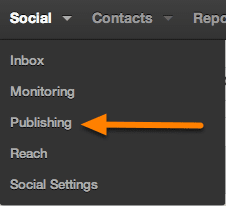
1. Go to the Bulk Scheduling tool
Navigate to Social > Publishing.
 2. Next click on the schedule in bulk upload icon next to the Compose a message button.
 3. You’ll then see the Bulk Scheduling tool appear.
4. In the drop down menu, choose the account you want to publish to.
This really only matters if you have more than one twitter account.
3. Download the bulk scheduling spreadsheet
HubSpot has a template that you can download in the form of an excel spreadsheet. For best results, download and use the customized template file provided for you in your account. You can download this by clicking on the Download a customized sample file link on the Schedule in Bulk pop-up window
4. There are four main columns in the downloadable template file: Date, Message, Link, and Campaign.
- Date – Dates must entered in the format “mm/dd/yyyy hh:mm.” So for example, if you want to enter “3:00 PM on April 8, 2014,” you’d type “04/08/2014 15:00.” This field is required.
- Message – The message is the actual text of your tweet. Any links included in this column will be automatically shortened. This field is required.
- Link – The link is the URL that you are sharing in your tweet. All links will be shortened automatically. This field is optional, as you might choose to include your link in the message column (as part of your message), or to compose a tweet with no link at all.
- Campaign – Associate your tweets with a campaign name to help organize and track your work. This field is optional.
These columns can be in any order in the file you upload, but they must be present on the first page of your spreadsheet. Any information included on other pages or in other columns will be ignored.
5. Upload your spreadsheet
On the Schedule Twitter Messages in bulk pop-up window, choose, click on the Choose File button to select the spreadsheet that you want to upload from your computer. Now choose your spreadsheet file from your documents.
6. Click the Upload button to finish scheduling your tweets.
7. A few notes
- You can’t add images directly to the spreadsheet, however, you can go into the social publishing section and go to Scheduled tweets. Here you can add photos to any of the tweets you’ve uploaded.
- If your times or dates are not entered correctly they will not be scheduled and you will receive an error message after you upload your spreadsheet.
Want more tips and tricks on how to make the most of your tweets, check out this blog post!
Happy tweeting!
Subscribe to Our Blog
Join hundreds of people who get free and fresh content every week.