 Lead nurturing, also known as drip marketing, is the process of creating (and testing!) a series of emails to help you build a relationship with your leads. This is a crucial part of the inbound marketing.
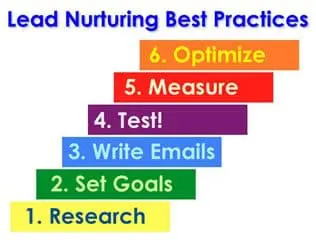
1. Research buying cycle with sales team
Goal: Understand where your offers fit into your buying cycle.
2. Develop campaign goals
Goal: Create a goal for the campaign and each email so you can measure the campaign’s effectiveness.
Campaign goals can be:
- Build relationship with top or middle of the buying cycle
- Move top of the funnel lead to middle of the buying cycle
- Move middle of the funnel lead to bottom of the buying cycle
- Re-engaged unqualified bottom of the buying cycle leads
3. Write each email
Goal: Move the leads down the buying cycle in order to better qualify them for sales.
Each email should include:
- From Name: “Person’s Name – Company Name”
- Reply to email: Email address of from name
- Subject Line: Less than 45 characters that provides the value/offer and a compelling reason why they should open the email.
- Email Headline: The first two sentences should relate to the email subject line and provide information on the emails content.
- Email Body: Should be short, ideally 150 words or less that includes one call to action related to the goal of the email. Use the worksheet you created in step 1 to help you determine what call to action each email should have in relationship to the buying cycle.
- A unique tracking URL for all links in that email: This is very critical, so you can track how many people converted on the mails call to action and the effectiveness the email.
- Signature: Make sure the “from name” signs the email using the name that is in the “from” address.
4. Test your campaign
Goal: Checking to make sure the emails are written well, include links and are clear to the recipient.
Before you launch your campaign you should have people that you work with actually go through the campaign. These people should all work in different departments. Send them each email in the campaign and have them communicate back to you if there are grammar mistakes, something confused them, the offers don’t align with the right sales cycle, etc.
Step 5: Measure Results
Goal: Determine the campaign’s effectiveness and performance.
Start measuring results as soon as they become available. You need to measure each email’s click-through rate, number of conversions on each landing page and the unsubscribe rate for each email.
The click-through rate is the percentage of people who clicked on a link in your email. The click through rate should be at least 5% for a good campaign. The unsubscribe rate is the % of people who click the “unsubscribe” link at the bottom of the email (this link is required by law). The unsubscribe rate should be less than 1% for a good campaign.
6. Optimize emails
Goal: Fix emails that have low click-through rates, conversions or high unsubscribe rates.
You need to start optimizing the emails once you have collected data. If you see a high click-through rate after your first email, but the click-through rate sharply declines for the second you should try adjusting the email copy or changing the email timing.
The same goes for unsubscribe rates. You should modify the email’s content or timing frequency when you notice a greater than 1% unsubscribe rate. Here are some adjustments you can make to increase your campaign’s effectiveness:
- Wording of the subject line
- Wording of the email
- The offers or “next steps” you are promoting in the email
- Timing of the email (too late or early in the lead’s buying cycle)
- Is the information in the email or offer truly valuable to the lead?
Subscribe to Our Blog
Join hundreds of people who get free and fresh content every week.